Saturday, October 31, 2009

My first tarte tatin

Along with all the apples that have been arriving, we've also been getting loads of pears. We've mostly gotten Bosc pears, but some Seckles arrived a few weeks ago also. So - with a dinner party in the planning, I decided that it was the perfect time to make a Pear Tarte Tatin - a delicious and very pretty dessert! It's super easy, especially if you buy a pre-made pie crust, and the rest of the ingredients are staples in any baker's kitchen...


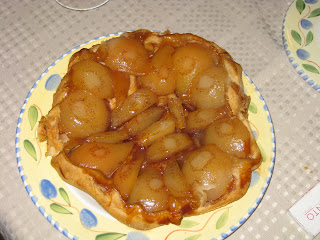
Rustic Pear Tarte Tatin

Ingredients:

5 pears - peeled, cored and halved

1/8 cup sugar

1/2 cup brown sugar

1 tbsp lemon juice

2 tbsp butter

1/4 tsp cinnamon

1/4 tsp ground cloves

1 store bought pie crust


--> Use a little bit of butter to grease the bottom and sides of a pie dish (9 inch pie dish works well). Sprinkle the white sugar on the bottom and sides of the dish. Arrange the pears, cut side up, in a tightly packed ring around the dish. Sprinkle half the brown sugar over the pears, followed by the lemon juice. Then, cut up the 2 tbsp butter into small dabs and dot the tops of the pears with it. Mix the other 1/4 cup of brown sugar with the cinnamon and cloves and sprinkle that all over the pear arrangement.


--> Now, lay the pie crust over the pears and tuck the dough down the sides of the dish around the pear ring. The sides will encircle the ring of pears once the tarte is baked.


--> Bake at 375 F for a little over an hour, or until a golden syrup has formed on the bottom of the dish. Take out of the oven and let stand for 5 min. Run a knife around the sides of the tarte and then place a platter tightly over the pie dish and flip the tarte over. Serve and enjoy!

Wednesday, October 28, 2009

Collard Greens - Take 2


I'm sure there's some quote about second chances that I could have used for this post, but it's been a long week and it's not top of mind right now. Collard greens arrived in my share about a month ago and I really wasn't sure what to do with them. Years ago I had pretty amazing collard greens at Emeril's restaurant in Orlando, so I figured no matter what I did with the greens, I'd probably like them. I couldn't have been more wrong. Most collard greens recipes include some form of pork (ham hock or bacon) - which I don't eat. So, I was looking for a vegetarian collard greens recipe, which were few and far between. I finally found one, which I tried and it was gross. I was ready to give up on this green.


Until... my dad sent me a Giada recipe today. I'm not even sure he knew that I had a bunch of greens sitting in my kitchen. The recipe was for Swiss Chard or kale, but it worked great for my collards too. And, it's now official, I don't dislike collard greens, I just initially tried a bad recipe.


Courtesy of Giada De Laurentiis - Wilted Greens with Ricotta Salata

Ingredients:

2 bunches greens (swiss chard, kale, collard greens, spinach - whatever you have or prefer)

3 tbsp olive oil

1 large yellow onion or a few small shallots - sliced up

4 garlic cloves, minced

1/2 cup chicken broth

2 tbsp soy sauce

1/4 tsp ground black pepper

3 oz ricotta salata cheese (or feta if you prefer)


-->Wash your greens, but don't worry about drying them. Actually, I found that my collards kind of repelled water, so that wasn't really an issue. Trim off the stems and then chop the chard in big pieces. Remember, all these greens wilt very nicely, so they will shrink up to more bite size pieces.


--> Using a big pot on medium-high heat, warm up 3 tbsp olive oil and then add the onions. Saute for a few minutes, as they are cooking up (getting yellow and softening), add the garlic. Saute for a few more minutes before adding the greens, chicken broth, soy sauce and ground pepper. Stir a lot - not constantly but so that they get mixed around. Cook until the greens have wilted and become tender, about 7-10 minutes.


--> Transfer to a plate or bowl and crumble the cheese over the top. Enjoy!


Sunday, October 25, 2009

Beets - it's what's for dinner

I am a huge fan of roasted beets. They're just basically delicious. I eat them plain, or with feta cheese, or in my salads. Doesn't really matter to me - I just love them. Before the CSA I had actually never made roasted beets myself. I had eaten them in restaurants and admittedly, out of a can too. But, last year when fresh beets started flowing in weekly, I was introduced to the beauty of fresh roasted beets. And, I even learned how to roast them without turning my fingers red!! There are lots of tips and tricks out there on the web that address the red finger issue, and I've tried a whole bunch. My favorite method is to put the beet inside an aluminum foil packet sealed up tight and roast in the oven at 375-400 F for an hour and a half to 2 hours (depending on the size of the beet). When you take the beet out of the oven, let it sit inside the packet for 15-20 min before attempting to peel. The skin of the beet should basically sweat off and will come right off with a knife. Because they cook for a long time, I usually make them when I have my oven already on while cooking something else. You can make a whole bunch at once and store them cooked & peeled in a tupperware in the fridge - which makes them all set for a perfect, healthy snack at any time!

For more readings on beets, check out this article from the NY Times - they're not only delicious, but super nutritious too!
http://www.nytimes.com/2008/08/04/health/nutrition/04recipehealth.html

Tuesday, October 20, 2009

Bite of Bread

So this post is a shameless plug for my future business, Bite of Bread. I'm working on a website that I will link to this blog if I ever make it live. But, for now - I'll just tell you about some of the breads I make. Sorry, I'm not going to share my special, perfected bread recipes (that would probably kill the market for my business), but since I tried a new one, I'll share the love.

Tonight's featured bread is Pear Bread - the past few weeks fruit deliveries have been apples & pears, and since we already made applesauce, we needed something fun to do with the pears. Just about 2 weeks ago we got about a dozen Seckle Pears, which are smaller pears but incredibly juicy once they're truly ripe. They worked wonderfully...

Pear Bread
Ingredients:
5 small pears - diced up
1 small pear - mashed (to get more of the juice)
1 egg, beaten
1 egg white, beaten
2 tbsp water (a little more or a little less depending on how juicy your pears are)
1 tsp vanilla extract
1.5 cups flour
3/4 cup sugar
1/4 cup instant vanilla pudding mix
1.5 tsp cinnamon
1/2 tsp baking soda
1/4 tsp salt
1/8 tsp baking powder

--> Preheat oven to 325 F. Spray a loaf pan with Pam.

--> Mix up the wet ingredients in 1 bowl (pears, eggs, water, vanilla) and dry ingredients in a second bowl (flour, sugar, pudding mix, cinnamon, baking soda, salt and baking powder). Stir the wet ingredients into the dry until the mixture is wet. Don't overmix. Then transfer to the loaf pan.

--> Bake for 1 hour or until toothpick comes out dry.

The Perfect Side Dish - Roasted Potatoes

I honestly haven't been cooking that much this week. So, with the arrival of my new share tonight, the number of potatoes in my fridge has grown to more than a dozen. I'm not big into mashed potatoes - I'm much more of a roasted or baked potatoes kind of girl... my mom happens to make the world's BEST baked potato. You have no idea - and sorry, but I'm not going to give away her secret recipe!! Since I know not everyone that reads my blog is as into cooking as I am, I thought I'd give you all a super simple recipe that is pretty hard to screw up (and that doesn't give away family secrets!): roasted potatoes...

Roasted Potatoes
Ingredients:
potatoes - cut into rounds or 1/4 inch cubes
sliced onions
paprika
salt
pepper
olive oil

--> Drizzle olive oil in a baking dish, drop in all the potatoes and onions and sprinkle with paprika, salt & pepper. Cook for at least 1 hour on 375 F. Move the potatoes around after ~1/2 hour so that potatoes don't stick and for them to cook evenly. THAT'S IT!!!

My lovely sister (and roommate) made me these potatoes tonight - she left them in the oven for almost 2 hours and they were PERFECT. These are super easy to make as a side dish for a big dinner - you can throw them in the oven and basically forget about them.

Tuesday, October 13, 2009

A trip to Morocco...

Okay, I wish I was taking a trip to Morocco... add that to my never-ending list of places I want to travel to. But, sadly, no big vacation left for me in 09. So, instead I took 2 cornish hens out of my freezer this morning and cooked them up - Moroccan style. And, I threw in a bunch of fall veggies that have ontinued to pile up in my fridge. The recipe is straight out of my Gourmet cookbook. Not that easy, but not impossible. The worst part was cleaning and cutting up the hens. But - there's no reason you can't make this with chicken breasts, legs, thighs or whatever. You can also add potatoes and carrots to the vegetable mix. Honestly - I don't think I care much for turnips, so when I make this next, I'll defnitely be using potatoes instead of turnips.

There's lots of ingredients in this - but don't get overwhelmed, half of it is just the spice mixture. Remember - you can use almost any fall veggies that you want (I highly recommend leaving in the squash and onions though), and you can use Cornish hens or chicken breast/thighs/legs.


Moroccan-Style Roast Cornish hens with Vegetables (from Gourmet cookbook)

Ingredients:

1 tsp caraway seeds

1 1/2 tbsp salt

4 garlic cloves

1/4 cup mild honey

1/4 cup fresh lemon juice

2 tbsp olive oil

2 tbsp paprika

4 tsp ground cumin

2 tsp ground ginger

1 1/2 tsp ground cinnamon

1/2 tsp cayenne

1 tsp ground black pepper

4 Cornish hens, rinsed & patted dry

2 large zucchini, halved and cut into pieces

2 medium turnips, peeled, halved and cut pieces

2 red bell peppers, cored, seeded and cut into pieces

1 medium butternut squash, peeled, seeded and cut into pieces

2 medium onions, cut into wedges

1 can (28 oz) whole tomatoes in juice, drained and chopped

1/2 cup chicken stock (low-sodium is best)

Garnish (optional): 6 tbsp chopped parsley, cilantro and mint


--> With rack in middle of oven, preheat to 425 F. Oil a large roasting pan.


--> Coarsely grind caraway seeds with salt (in a spice grinder if you have one, otherwise with the back of a knife or rolling pin). Mince garlic, then mash to a paste with caraway mixture. Transfer paste into a large bowl and whisk with honey, lemon juice, oil, and spices.


--> With kitchen shears, cut out and discard backbone from each hen. Then halve each hen lengthwise.


--> Put zucchini, turnips, peppers, squash and onions in oiled roasting pan. Add half the spice mixture and toss well until coated. Add tomatoes and stock and stir well, then spread vegetables out in pan. Add hens to remaining spice mixture and toss to coat, then arrange hens breast side up over vegetables in pan. Cover pan tightly with foil and roast 1 hour.


--> Uncover and roast hens until browned and veggies are tender, for 20-30 min more. Skim fat from cooking liquid. Serve over couscous and sprinkle herbs on top for garnish.

Sunday, October 11, 2009

How do you like them apples?

Even if I ate an apple every day, I'd still have some left over each week when the next share delivery arrives. This past week, I don't think I had any apples - so, with the whole bag staring at me from my fridge, it was time to peel, cut, core and make applesauce!! Probably the easiest of all the apple recipes...

Applesauce - au naturel style
Ingredients:
Apples - peeled, cored and cut in quarters
Sugar
Cinnamon

Like I said, this is real easy... put all your apples in a big pot - add a little bit of water from the sink and boil on medium. Every so often, stir the apples so that the ones on the top eventually get mixed to the bottom. If you leave them on the heat long enough, they basically fall apart - otherwise you can bring out my most favorite kitchen gadget - the immersion blender (thanks Risa!). After 15 min or so (use your judgment based on the amount of apples you use), take the pot off the heat and blend up. Okay, if you don't have an immersion blender, you can just mash with a fork... Then add sugar and cinnamon to taste. Voila - there's your applesauce.

I used a mix of apple varieties - but according to some random website, Fuji and Gala apples are among the best for making applesauce. Jonagolds, Golden Delicious, Empire and Macintosh work quite well too.

Note: I've been asked what "a little bit of water" means - I'd say 1/4 inch of water is good if you like chunkier applesauce. If you prefer your applesauce "looser" then add a little more water.

Monday, October 5, 2009

Apples, apples, apples...

What would fall in the Northeast be like without apples? Better yet, what would it be like without apple pies and applesauce?! This week we made our favorite apple pie - applesauce will probably be later in the season. It's a pretty easy one, especially if you buy a pre-made crust from the supermarket!

Apple-Pear Nilla-Wafer Pie
Ingredients:
Half a box of Nilla Wafers
1/4 cup brown sugar
1/4 cup butter, melted
3 apples (peeled)
1 pear (peeled)
1 refrigerated pie crust
1/3 cup white sugar
1/4 cup flour
1/2 tsp cinnamon

--> Preheat oven to 375 F. Crush up the Nilla wafers and mix with brown sugar and melted butter until blended together well.

--> Combine sliced apples and pear in a mixing bowl with the white sugar, cinnamon, and flour - toss well so that the fruit is well coated.

--> Time to put the pie together! Lay the pie crust out over the bottom of your greased pie plate. Sprinkle half the Nilla wafer mixture on the bottom of the crust. Layer in the fruit, followed by the rest of the Nilla wafer mixture. Bake for 35 min or until the fruit has softened and the crust is lightly browned. If the pie looks like it is starting to burn and the fruit isn't soft yet, cover with aluminum foil about halfway through cooking time.

--> Cool and serve... it's especially good with some vanilla ice cream :)

Sunday, October 4, 2009

Long John Prune Plums - solved!


If you google "Long John Prume Plums" you're not going to come up with so many options of what to do with these cooking plums... So, when these plums arrived last Tuesday, we were baffled. I tried to eat them just raw (ignoring the notice that these were "cooking plums") but the skin is a bit sweeter than regular plums, making them a little too sweet to eat uncooked. I searched and searched for what to do with them and finally decided to make a clafouti. What's a clafouti you ask? According to wikipedia, it's a french dessert that has baked fruit mixed in with a batter that is a cross between pancake batter and custard. It's more of a cake, but we made it in a pie dish. I had no idea how the clafouti was going to turn out- I've never even tasted a clafouti before and don't think I ever had a baked plum dessert... But, I just took it out of the oven and had a taste and it's delicious!! It's super simple to make so I hope you're not thrown off by the name... here you go, give it a try!

Plum Clafouti
Ingredients:
5 Long John Prune Plums (pitted and halved)
1/4 cup plus for sprinkling sugar
1 cup milk
2 eggs
1 cup flour
dribble of vanilla
dash salt
sprinkle of cinnamon
dab butter


--> Oven to 350 F. Rub a dab of butter on the bottom and sides of your pie plate. Sprinkle sugar on the bottom of the pan. Arrange the plum halves cut side down to cover the bottom of the pie plate. Sprinkle a little more sugar over the plums.

--> Mix the rest of the ingredients together in a bowl (milk, eggs, sugar, flour, vanilla, cinnamon, and salt). It might be a little lumpy, try your best to get rid of the lumps - mush with the back of your spoon or a fork or whatever you think works best. When done mixing, pour the batter over the plums.

--> Bake for ~40 min or so at 350 F. Check every so often to make sure you don't overcook. Remove from oven when done.

Note: I used a somewhat smaller-sized disposable pie dish - if your pie dish is bigger, you're going to need more plums and more batter, so improvise as needed. It'll also probably take another 10 min or so to cook through.


Another Note: So - one thing I left out is that actual clafouti recipes do call for you to blend all of the ingredients together (in step 2) in a blender. I'm a little lazy when it comes to washing dishes, so if you're not as lazy, use a blender and avoid having to mash up the clumps!

Twist on Lasagna...

One of the most common greens that I get from the CSA is Swiss Chard. I wasn't really familiar with Swiss Chard before the CSA, so I didn't really know what to do with it aside from add it to a stir fry. I liked it, but my sister wasn't the biggest fan. So, mid-way through the 2009 season, we decided to see if we could find a better use for Swiss Chard. That's when I stumbled on a vegetable lasagna recipe that called for Swiss Chard instead of Spinach - the first step in the recipe was putting the swiss chard in a pot of boiling water for about 5 minutes. WOW - now, this was the way to eat Swiss Chard! My sister loves the lasagna and we have a new appreciation for our Swiss Chard.

This lasagna recipe isn't a traditional red sauce lasagna, but since making this one, I have used Swiss Chard in my traditional lasagna recipe instead of spinach and it makes the dish so much better! The recipe below is straight out of Deborah Madison's Local Flavors cookbook - if you're a CSA member, this book is a must have!! It was a new one for me, so I didn't even try to mess with it-

Lasagna with Chard, Ricotta & Walnuts (Local Flavors: Cooking and Eating from America's Farmers' Markets)
Ingredients:
1 cup freshly cracked walnuts
sea salt & freshly ground pepper
2-3 lbs (or bunches) of chard, leaves only
2 tbsp EVOO
3 large garlic cloves, minced
1/3 cup white wine
1 cup ricotta cheese
1 cup Parmesan cheese
2 balls fresh mozzarella (or you can use shredded)
1 1/4 cups milk
1 box no-boil lasagna noodles

--> Boil a lot of water for the chard. Preheat oven to 400 F. Put the walnuts in a pan and toast until they get pale gold in color and start to smell good (~7-10 min). Chop finely and set aside.

--> When the water boils, add some salt and the chard. Boil the chard in the water for ~5 min and then remove and press out most of the water. Reserve the water for Step 4. Then chop the chard as finely as you can.

--> Heat the oil in a wide skillet and add 2/3 of the garlic and then the chard. Cook over medium-high heat turning frequently for a few minutes. Add the wine and allow it to cook down. Turn off heat.

--> Combine the ricotta, Parmesan, and all but 3/4 cup of the mozzarella and the rest of the garlic in a bowl. Stir in 1/3 cup of the chard water, then add the chard. Mix together and season w/salt and pepper as desired.

--> Time to put your lasagna together... Spray a lasagna pan w/PAM and drizzle 1/4 cup of milk on the bottom of the dish. Fit 3 pieces of the lasagna noodles on the bottom of the baking dish. Sprinkle with 1/4 cup milk, 1/3 of cheese mixture, and 1/4 cup of the walnuts. Add next layer of noodles and repeat with milk, cheese and nuts. Then one more layer of noodles, followed by more milk, cheese, and nuts. Add the remaining mozzarella that was originally set aside.

--> Bake covered with aluminum foil for 25 minutes. Then, remove the foil and bake for another 10 minutes or until lightly browned. Let sit for 10 minutes, then serve!

Also - this freezes and reheats well... we made a large portion and then ate it for the rest of the summer!

First winter squash of 09!

Ah - winter squash... I love it. When the first winter squash comes in the share it's a real turning point in the seasons - it definitely means it's gotten colder out and sadly, we're nearing the end of this season's deliveries. But, it's just the beginning of the winter squash deliveries so I won't get too sentimental.

The first delivery of squash was 2 acorn varieties. My sister (my roommate and partner-in-crime in cooking) and I decided that instead of just roasting the acorn squash this week, we were going to try something more adventurous... Winter Squash Risotto!!! A good friend who knows me all too well got me an awesome recipe book that is my go-to when I don't know what to do with a new vegetable. I found a recipe in the book that we took and adapted to be a little healthier and more to my liking...

Winter Squash Risotto (I used acorn squash):
Ingredients:
2 acorn squash (medium sized) - cooked (see step 1 below)
6 cups vegetable or chicken broth
salt & pepper
1.5 tbsp butter
1 shallot, diced
1 1/2 cups Arborio rice
1/4 to 1/2 cup of Parmigiano-Reggiano
olive oil (for cooking of squash)

--> Oven to 350 F. Cut squash in half and remove seeds and stringy-ness. Put the halves cut side down on a cooking sheet with a drizzle of olive oil underneath each half. Cook for ~40 min or until your squash is soft enough to remove the flesh, mush up and throw out the skin. Then set aside.

--> In a large pot, bring the veg/chicken broth to a boil, then lower heat to keep at a simmer.

--> In a second large pot - preferably a wide and deep soup-pot - melt the butter over medium-high heat and add the shallot. Cook for 3-5 min or until shallot is soft and lightly colored. Add the rice, stir it so that it gets coated in the melted butter and cook for 1 minute (continue to stir - otherwise your rice might stick to the bottom of the pot). Turn the heat to high and add 2 cups of simmering broth and cook at a boil - stir only occassionally. Once the 2 cups are fully absorbed, add another 1/2 cup of simmering broth. Continue cooking and stir constantly. Once the 1/2 cup is absorbed, add another 1/2 cup (continue until 4 cups in total have been added to the rice pot). After the last 1/2 cup of broth is absorbed, mix in the mashed up, cooked squash. Stir to mix in and add another 1/2 cup of broth to the rice/squash mixture.

--> Once the squash is added, you also might want to salt and pepper the risotto to your liking. Continue to cook, stir and add liquid until the rice is nicely al dente (you're going to have to do some taste testing on this one - I found that my risotto was perfect after 5 cups of broth had been aded - you might want a little more or a little less).

--> When you are satisfied with the texture of the risotto, remove from heat and mix in the grated Parmiggiano-Reggiano cheese. Add more salt and/or pepper if you want. Serve hot - it will be so good that you won't be able to resist eating immediately anyway!

My CSA story

I should have started this blog last year, but I guess better late than never! I love to cook and joined a CSA last summer - so thought it would be pretty awesome to share my recipes with the world as I try them out. I know that there are millions of recipe websites out there, but what makes my blog unique is that everything I make is seasonal- the fruits and veggies that I use are what's ripe at a local farm at that time of year.

What's a CSA you ask? CSA stands for Community Sponsored Agriculture... basically, every week from June through November I get a delivery of seasonal, local, organic fruits and vegetables. And every week, I try and come up with fun, new, healthy recipes to make with my delivery.

I made one of my best recipes ever today, so I thought it was a great place to start. Happy reading... and happy eating!!